Windows 10 Is Not Reading My External Harddrive for Image Backup
Windows ten fill-in not working/ system image fails [Fixed]
Updated: Posted: March 2018
- On rare occasions, the Windows 10 backup or system epitome is unusable exactly when you need information technology about.
- To avoid this frustrating situation, make sure to check out the prerequisites we listing below, as well as the steps to troubleshoot it.
- The comprehensive guide below explains multiple options, including how to format your external hard drive or plow on organisation protection.
- Continue reading to notice how to properly exercise these things, plus many more. Y'all can fix the effect manually from Windows settings or with the help of other software.

XINSTALL By CLICKING THE DOWNLOAD FILE
Having a system backup is always useful, especially if your organisation gets corrupt or damaged.
Although the system Backup tool in Windows 10 is a bully feature, it can sometimes fail to work on Windows x, and then let's run across how to prepare it.
This upshot comes forth with various error codes, which are equally follows:
- Windows ten backup error 0x807800c5
- Windows 10 backup fails to consummate
- Windows 10 backup did not complete successfully
- Windows 10 fill-in to network bulldoze fails
How to fix system backup bug in Windows 10
Table of contents:
- Delete the WindowsImageBackup folder
- Format your external difficult bulldoze
- Utilise a tertiary-political party backup tool
- Delete EFI System Partition and Recovery Partitioning
- Plow on System Protection
- Turn off System Protection and delete restore points
- Change the Disk Space Usage
- Utilise chkdsk command
- Apply diskpart to remove EFI partition
- Set your background to solid colour
- Disable whatsoever unnecessary disk tools
- Use a USB 3.0 hub
1. Delete the WindowsImageBackup binder
Sometimes you won't exist able to create organisation backup due to previous backup files, and in order to gear up this problem, you need to delete those files.
To do that, locate and delete WindowsImageBackup folder. If you want to save your previous backups, yous can also motion them from WindowsImageBackup to a different binder.
Every bit for the location of WindowsImageBackup folder, information technology should be located in the hidden binder C:/System Volume Information .
2. Format your external hard bulldoze
- Open This PC and locate your external hard drive. Right-click it and choose Format.
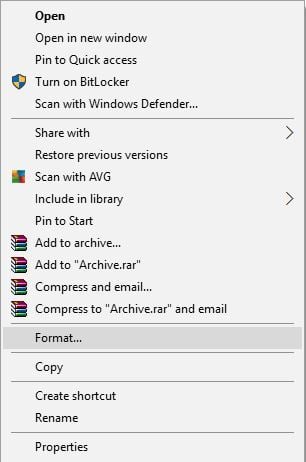
- When the Format window opens, check Quick Format choice and click Beginning push button. This process might take a minute or two, so be patient.
This is a prerequisite before creating a system backup image on an external hard drive. As well, before formatting your external hard drive make sure to motility any files from it to a rubber location.
Later on your external hard drive has been formatted, try creating the system backup on it again.
iii. Use a third-party backup tool
For a hassle-free fill-in procedure (and further use of the backup image), we recommend using a third-party tool.
According to your needs, information technology tin be useful to have dedicated backup software to help your secure your arrangement in instance of unpleasant events.
Thus if you crave effective tools to safely back up your files and stay relaxed, we recommend y'all the best backup software for Windows 10.
4. Delete EFI Arrangement Segmentation and Recovery Partition
In some cases, when you upgrade to Windows 10 or install it on a new hard drive, certain partitions from previous versions of Windows might still be present on your computer causing Arrangement Backup to fail.
In club to fix this, it'south advised that you remove EFI Organization Partition and Recovery Segmentation. To do that, follow these steps:
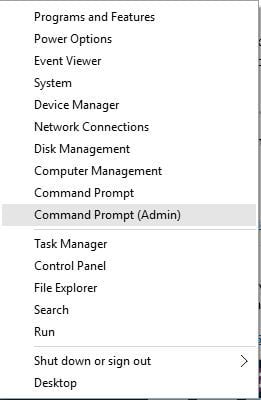
- Press Windows Fundamental + X and select Disk Direction from the carte.
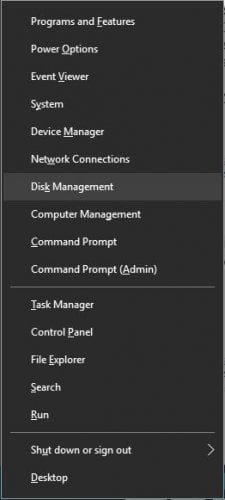
- When Deejay Direction opens, locate the hard bulldoze on which you wish to store your system backup.
- You should see EFI System Sectionalisation and Recovery Partitioning for that difficult drive in Disk Manager. Delete them both.
After deleting these two partitions, you should be able to successfully create system fill-in on that hard bulldoze.
5. Turn on System Protection
- Press Windows Key + S and type Arrangement. Choose System from the listing of options.
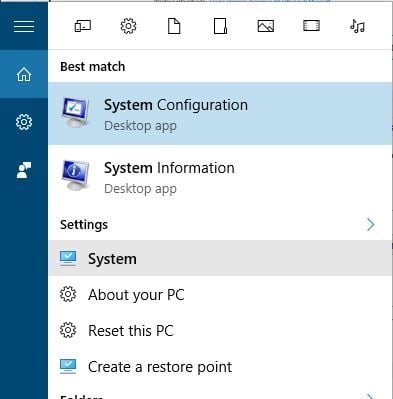
- When System window opens, click on System protection on the left.
- Locate Windows 10 System Epitome and click Configure.
- Select Turn on system protection and click Apply and OK to save changes.
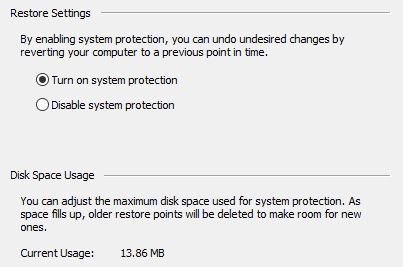
We have listed this solution because some users claim that in society to create System Backup, Arrangement Protection must be enabled on your PC.
6. Turn off System Protection and delete restore points
- Open Arrangement Protection. Yous can practice that by post-obit the steps from the previous solution.
- Locate your hard drive and click on Configure.
- Make sure to select Disable system protection.
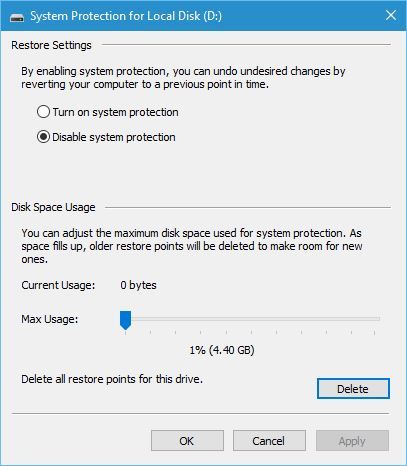
- Next, click on Delete button to delete previous restore points.
- Repeat these steps for all your difficult drivers.
Later you've disabled system protection and deleted previous restore points you should be able to create a organization backup.
7. Modify the Disk Space Usage
- Open System Protection.
- Select the book you're using for system paradigm and click Configure.
- Make sure that protection is turned on.
- In the Disk Space Usage section move the Max Usage slider to the left to near ten-15%. Few users report that Max usage was prepare to 100% on their estimator by default and that was the main culprit for system backup failure.
- After you've changed Max Usage value click Utilize and OK to save changes.
- Restart your figurer and check if the trouble is resolved.
8. Employ chkdsk command
- Press Windows Key + Ten and choose Control Prompt (Admin) from the carte.
- When Command Prompt opens yous need to blazon chkdsk /r 10: (remember to replace Ten with the correct letter that represents your difficult bulldoze partition) and press Enter to run information technology.
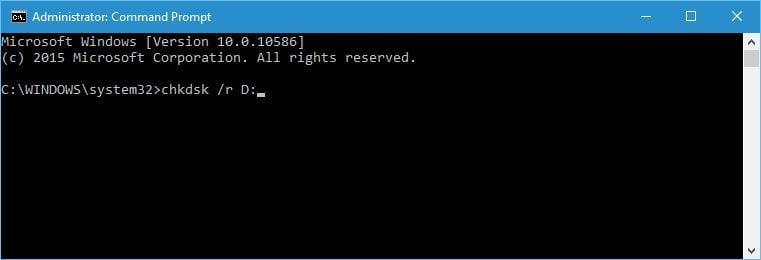
- Look for the procedure to complete and repeat the same process for all hard drive partitions.
We have to mention that you might be unable to run chkdsk command on drive C, and you lot'll be asked whether y'all want to browse drive C the adjacent time your arrangement restarts.
Press Y (Yes) and restart your estimator in order to scan and bank check bulldoze C.
If your hard drive contains corrupted files, a system backup will fail. This is why using the chkdsk command should repair them.
ix. Apply diskpart to remove EFI partition
If you install an boosted hard bulldoze and install new Windows on it, your previous EFI partition from the former hard disk can remain on your quondam hard drive and cause you problems with organisation restore.
Nosotros advise you lot to be extremely conscientious while using this method considering y'all tin can permanently delete your important files.
- Press Windows Key + X and choose Command Prompt (Admin).
- When Command Prompt opens, type diskpart and printing Enter.
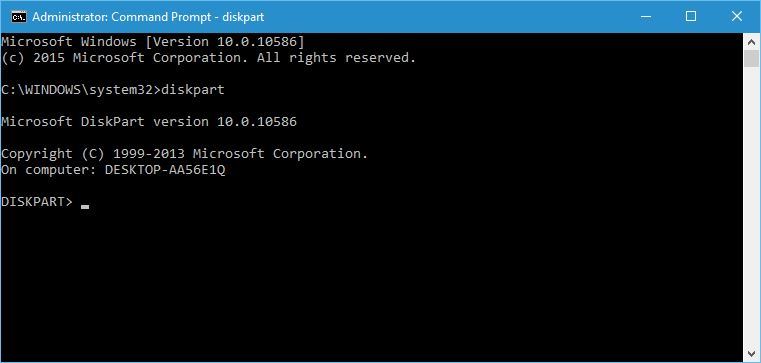
- Type list disk and press Enter. You should see several difficult drives bachelor.
- Find your old difficult drive on the list and type select Deejay 1 (alarm: we used select Disk 1 in our example, simply brand sure that you utilize the right number that matches your hard bulldoze in diskpart).
- Now type listing partition and press Enter.
- Locate the system partition and type select Partition 1 (again select Partition one is just an example, therefore, brand certain that the number matches the System sectionalization from diskpart).
- Optional: Backup all files from that partitioning considering they will get deleted.
- Type del sectionalisation override and press Enter. This will delete the segmentation and all files on it.
- Optional: Add the newly created free space to any other disk partitioning by using the Deejay Management tool.
Once once more, be extremely careful while doing this because you lot can permanently delete your organisation files if you lot're non careful. Utilise this solution at your ain risk.
x. Prepare your groundwork to solid color
- Right-click on your desktop and choose Personalize from the menu.
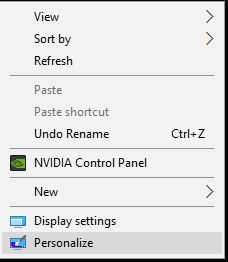
- Go toBackground and select Solid colour from the menu.
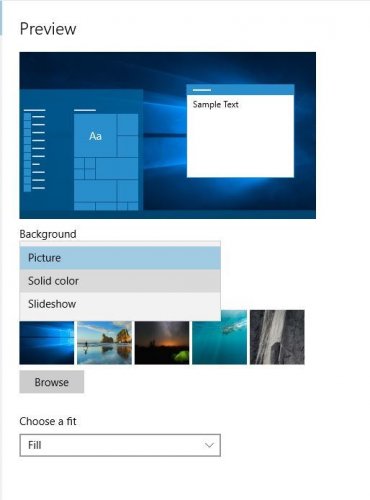
After changing the background to solid color system backup problems should exist fixed.
Information technology might seem unusual, only few users reported that arrangement backup issues tin can exist caused if your groundwork is set to Slideshow.
11. Disable any unnecessary disk tools
It was reported that certain disk tools tin cause problems with organization fill-in, therefore if you're using any deejay optimizers or disk cleaning tools make certain to disable them before trying to create a system fill-in.
12. Use a USB three.0 hub
Few users reported that using USB 3.0 external hard drives can cause problems due to USB 3.0 drivers. In order to avoid these issues, information technology's brash to use a USB 3.0 hub in order to connect your external drive.
This is just a potential solution, but few users had success with information technology, so possibly you could try it out.
System backup is rather important, and if you can't create organisation backup on Windows 10, make certain to endeavour some of our solutions.
And, if you've already tried, do let us know which ane worked for you!
Intendance to read more virtually using fill-in software? Go to our dedicated Backup Software folio.
Never miss a particular when fixing Windows errors by bookmarking our Windows 10 Troubleshooting Hub.
Frequently Asked Questions
-
-
Yes, the backup tool provided past Microsoft for Windows 10 is called File History and we have a full guide on how to use it.
-
At that place are enough of external HDDs where you tin back up your Bone; we have some recommendations particularly for installing Windows x on them.
![]()
Source: https://windowsreport.com/system-backup-windows-10/
0 Response to "Windows 10 Is Not Reading My External Harddrive for Image Backup"
Post a Comment